Do you want to learn how to automatically add page numbers, date and name of your document to your illustration in Adobe Illustrator? Here I can introduce you to a script, that can do it. Scripting for Adobe Illustrator will open new possibilities and speed up your workflows.
Adobe Illustrator is not InDesign, but as you can work with multipage documents in Illustrator, you sometimes need to set page numbers as well as the name of your file and maybe a date of creation.
Update! PageIndexer script. I’ve recently developed a new script PageIndexer, the ultimate solution for page numbering and annotation in Adobe Illustrator. If you’re interested in exploring this script and discovering how it can enhance your design projects, I invite you to check out my latest blog post. Check my Add Page Numbers and Annotations in Adobe Illustrator with PageIndexer script post to learn more about the PageIndexer script.
This example script places this information on your pages. I find this way more convenient than adding it manually. I customised the script and made an action that runs the script. That way I can insert all the information in my document with just one click. I’ve previously covered how you can record an action here.
I decided to split this topic into three parts. (Part 2 and Part3) Otherwise it will be a very long read, filled with a lot of information.
In this blog post I show:
- How to Download the script for free and completely anonymous.
- Where to save the script so that it’s found by Adobe Illustrator
- How it’ll look at your artboard after you execute it
If you want to go further and learn how to edit the script I’ll show:
- How you can deal with .txt and .jsx files
- A very brief introduction to javascript syntax
- Some very basics of artboard coordinates and text justification
This mini-series of blog posts are not a javascript tutorial. It’s more instructions, with a purpose to give you some courage to explore the scripting world. The first one (this) is more theoretical, while the next two will have a more practical approach.
So let’s get started.
Download the scripts
By clicking here you’ll download a ZIP-folder. Inside Zip-folder there are 4 pair of files: four .jsx (javascript) and four .txt (text).
PagesDateName.jsx / PagesDateName.txt
PageNumbers.jsx / PageNumbers.txt
Date.jsx / Date.txt
DocName.jsx / DocName.txt
The first script is an All-In-One script. It’ll both place page numbers, date and file name on your artboard. The three other scripts are separate scripts for every feature.
You can just take .jsx file and move them to your Adobe Illustrator script folder.
Windows
C:\Program Files\Adobe\Adobe Illustrator CC 2020\Presets\en_US\Scripts
Mac-OX
/Applications/Adobe Illustrator 2020/ Presets/en_US/Scripts
I’ve already covered in depth how to install scripts here.
After installing and running the script the information will appear on your artboard like in the picture below. If you are happy with this, fine. You don’t need to read the rest of this blog post. In case you want to customise it, but don’t have time you are very welcome to contact me for assistance.

However, if you are interested to learn how you can customise the script yourself, then read on.
We all have different needs and it could be that you have preferences on how, where and what information that should be inserted into your document. It will take a bit of work, but after you customised your script you can make an action with a short cut and use this feature over and over as you create your graphics, projects and documents.
So if you didn’t already download the file, go and do it. Make a folder in your computer to work with script files, while you are in a process of editing. When you are satisfied with the result, then move it to the Adobe Illustrator scripting folder. Let’s do some scripting.
.txt file
After you have saved the .txt file somewhere in your computer, you can open it in any text editing program. As examples of text editors there’s Notepad for windows or Notes for Mac. Using a word processor program, such as Word is not a smart idea as it will insert special codes and substitute parts of your text, so stick to a simple text editor. If you’ll get hooked on scripting you can get some special editors to work with scripts, but for our purpose, it’s not necessary.
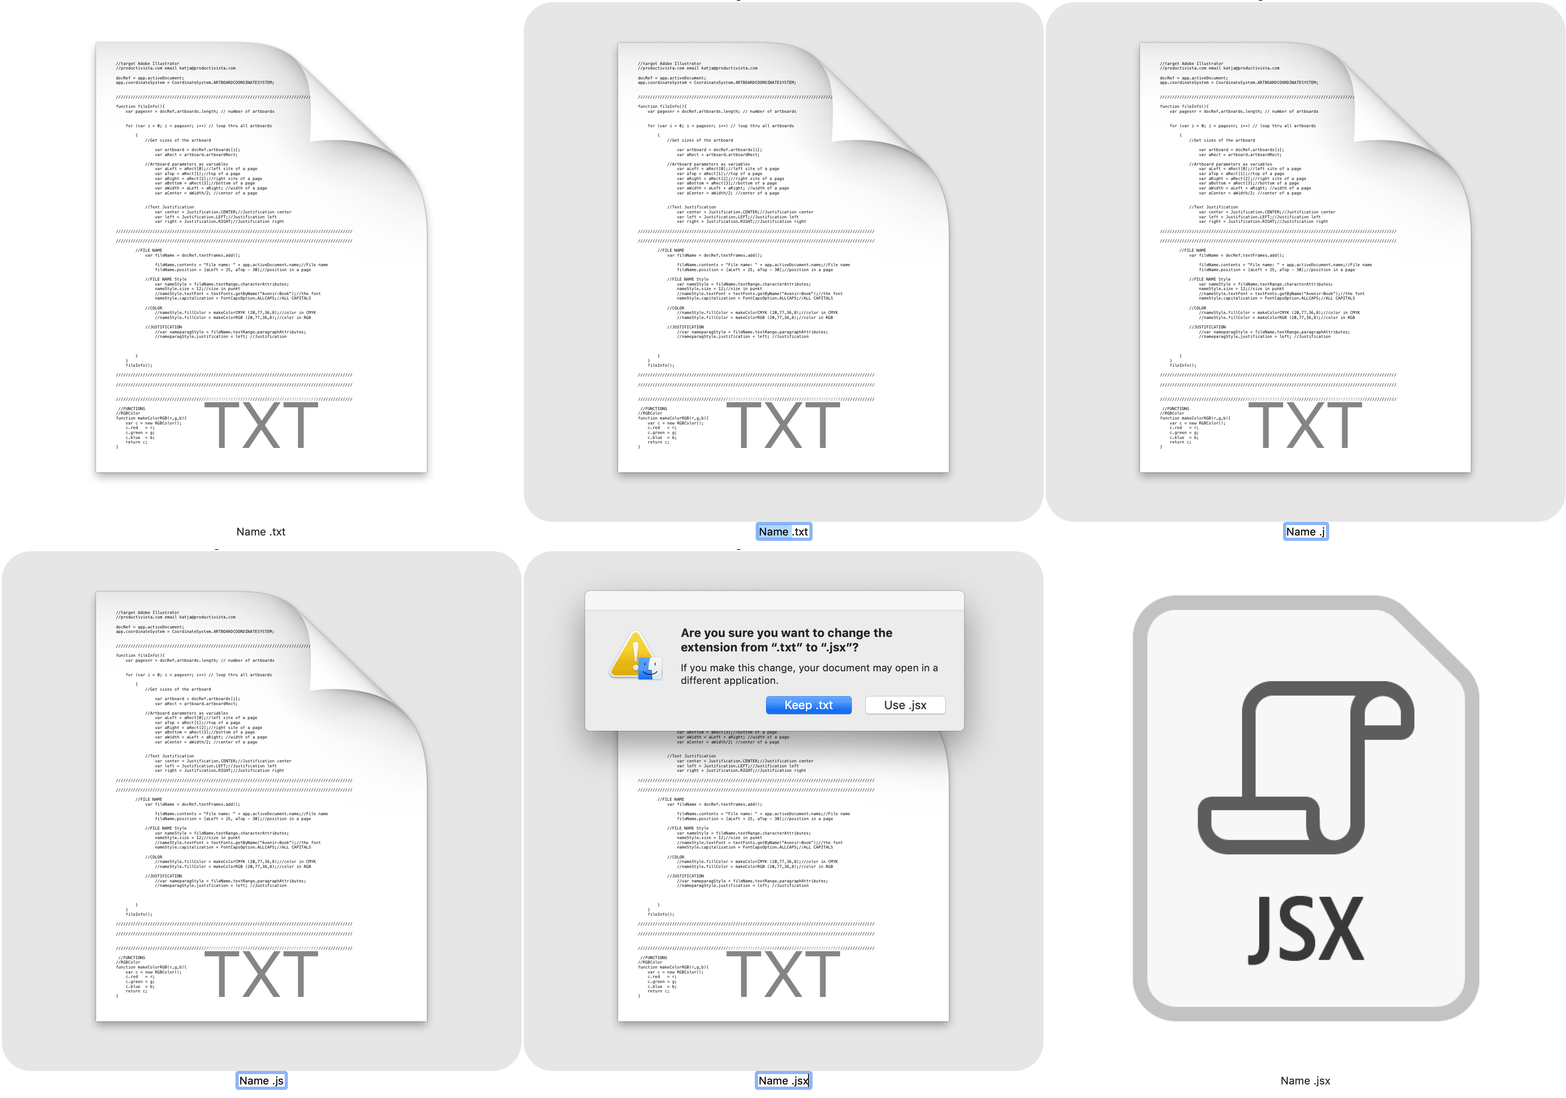
When you are finished with the editing process I suggest that you save a copy of your file as .txt. Then go to your script .txt file and rename it to .jsx like shown in the gif below.
The disadvantage of this method is, that you need to rename the file every time you want to run the script. But considering, that it’ll be one-time happening I think you can live with this little downside.
.jsx files
If you already have a special editor or you want to try to work with the real developer tool, you are also very welcome to do so. For example, you can download Visual Studio or ExtendScript ToolkitCC. With these tools, you can work directly with .jsx files. You’ll be able to test the changes you make on the fly. It’ll make the scripting process more dynamic, intuitive, and fun.
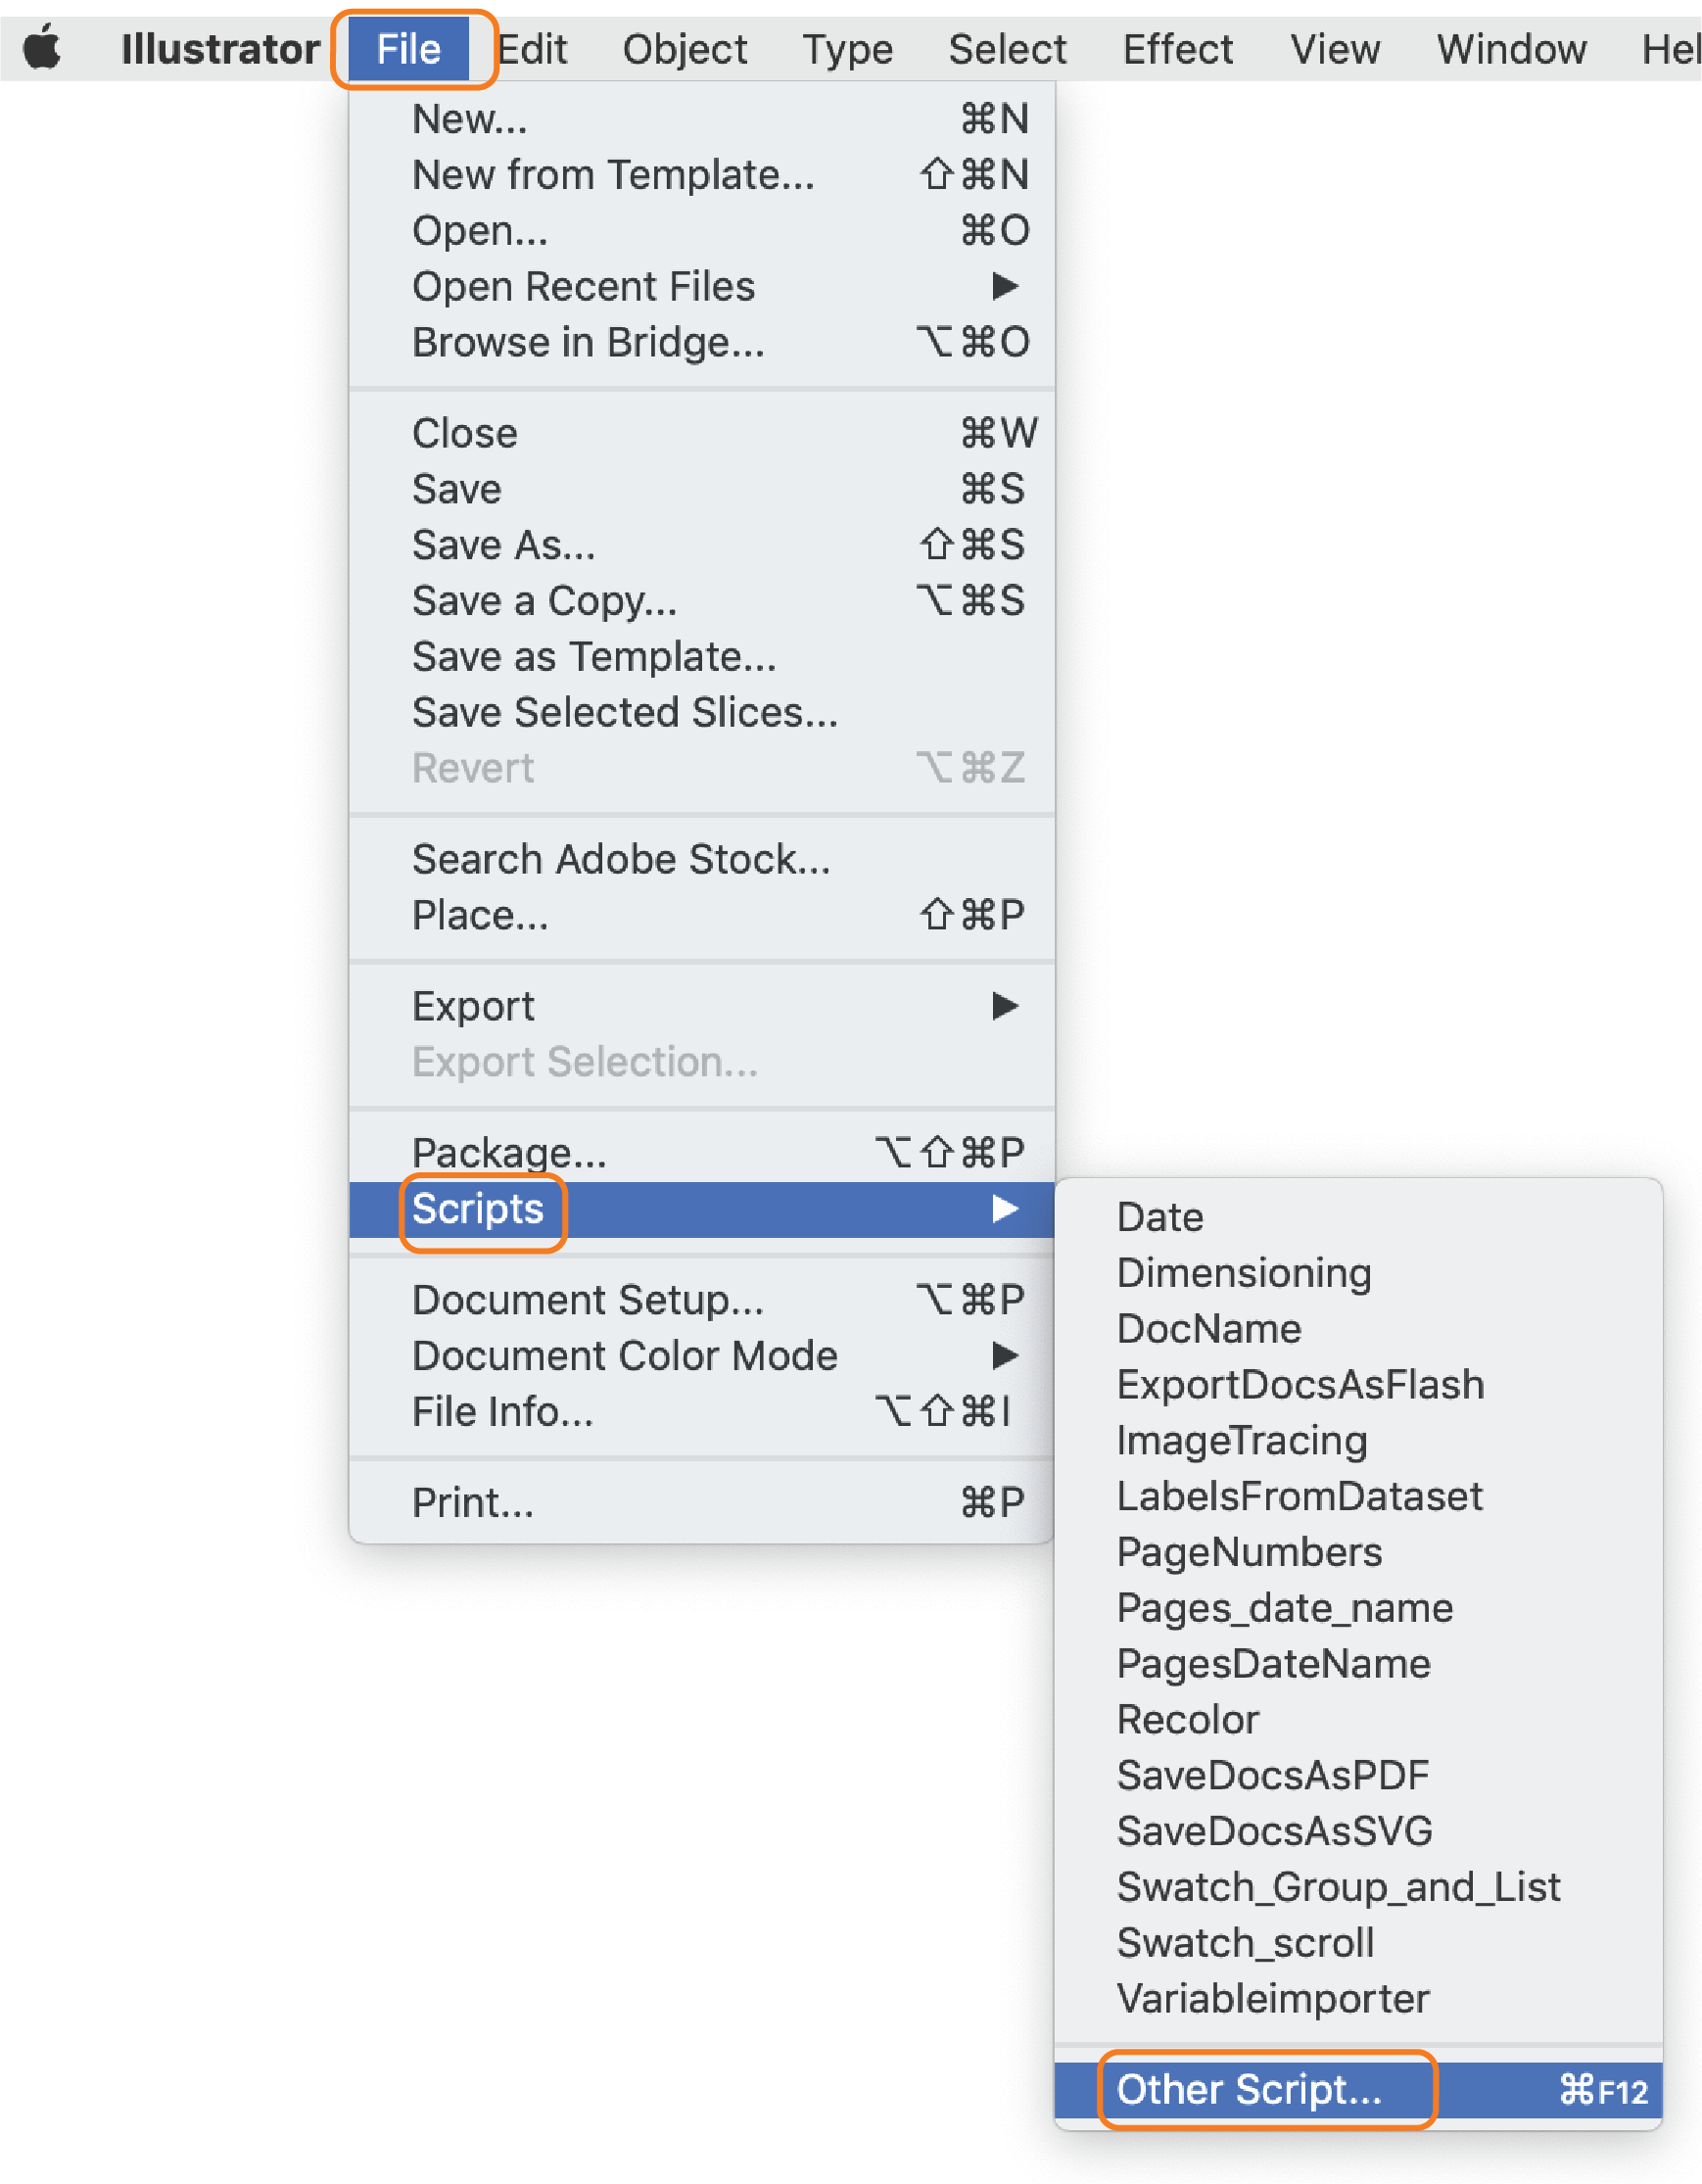
You can run the script directly from Extend Script Toolkit (ESTK) if you’ll choose this tool. If you want to do so with Visual Studio you’ll need to install a special extension Adobe Script Runner. You can also run you script directly from Adobe Illustrator. From File menu choose to Scripts – Other Script…and navigate to the folder with your script.
A brief and quick introduction
Syntax (good to know)
- If you want to deactivate a line insert // before it. This is also useful for comments and notes
- If you want to deactivate several lines write /* at the start and */ at the end.
- Delete these signs if you want to activate the line or paragraph again.
Part 1: Coordinates, Margins, Justification
Artboard coordinates
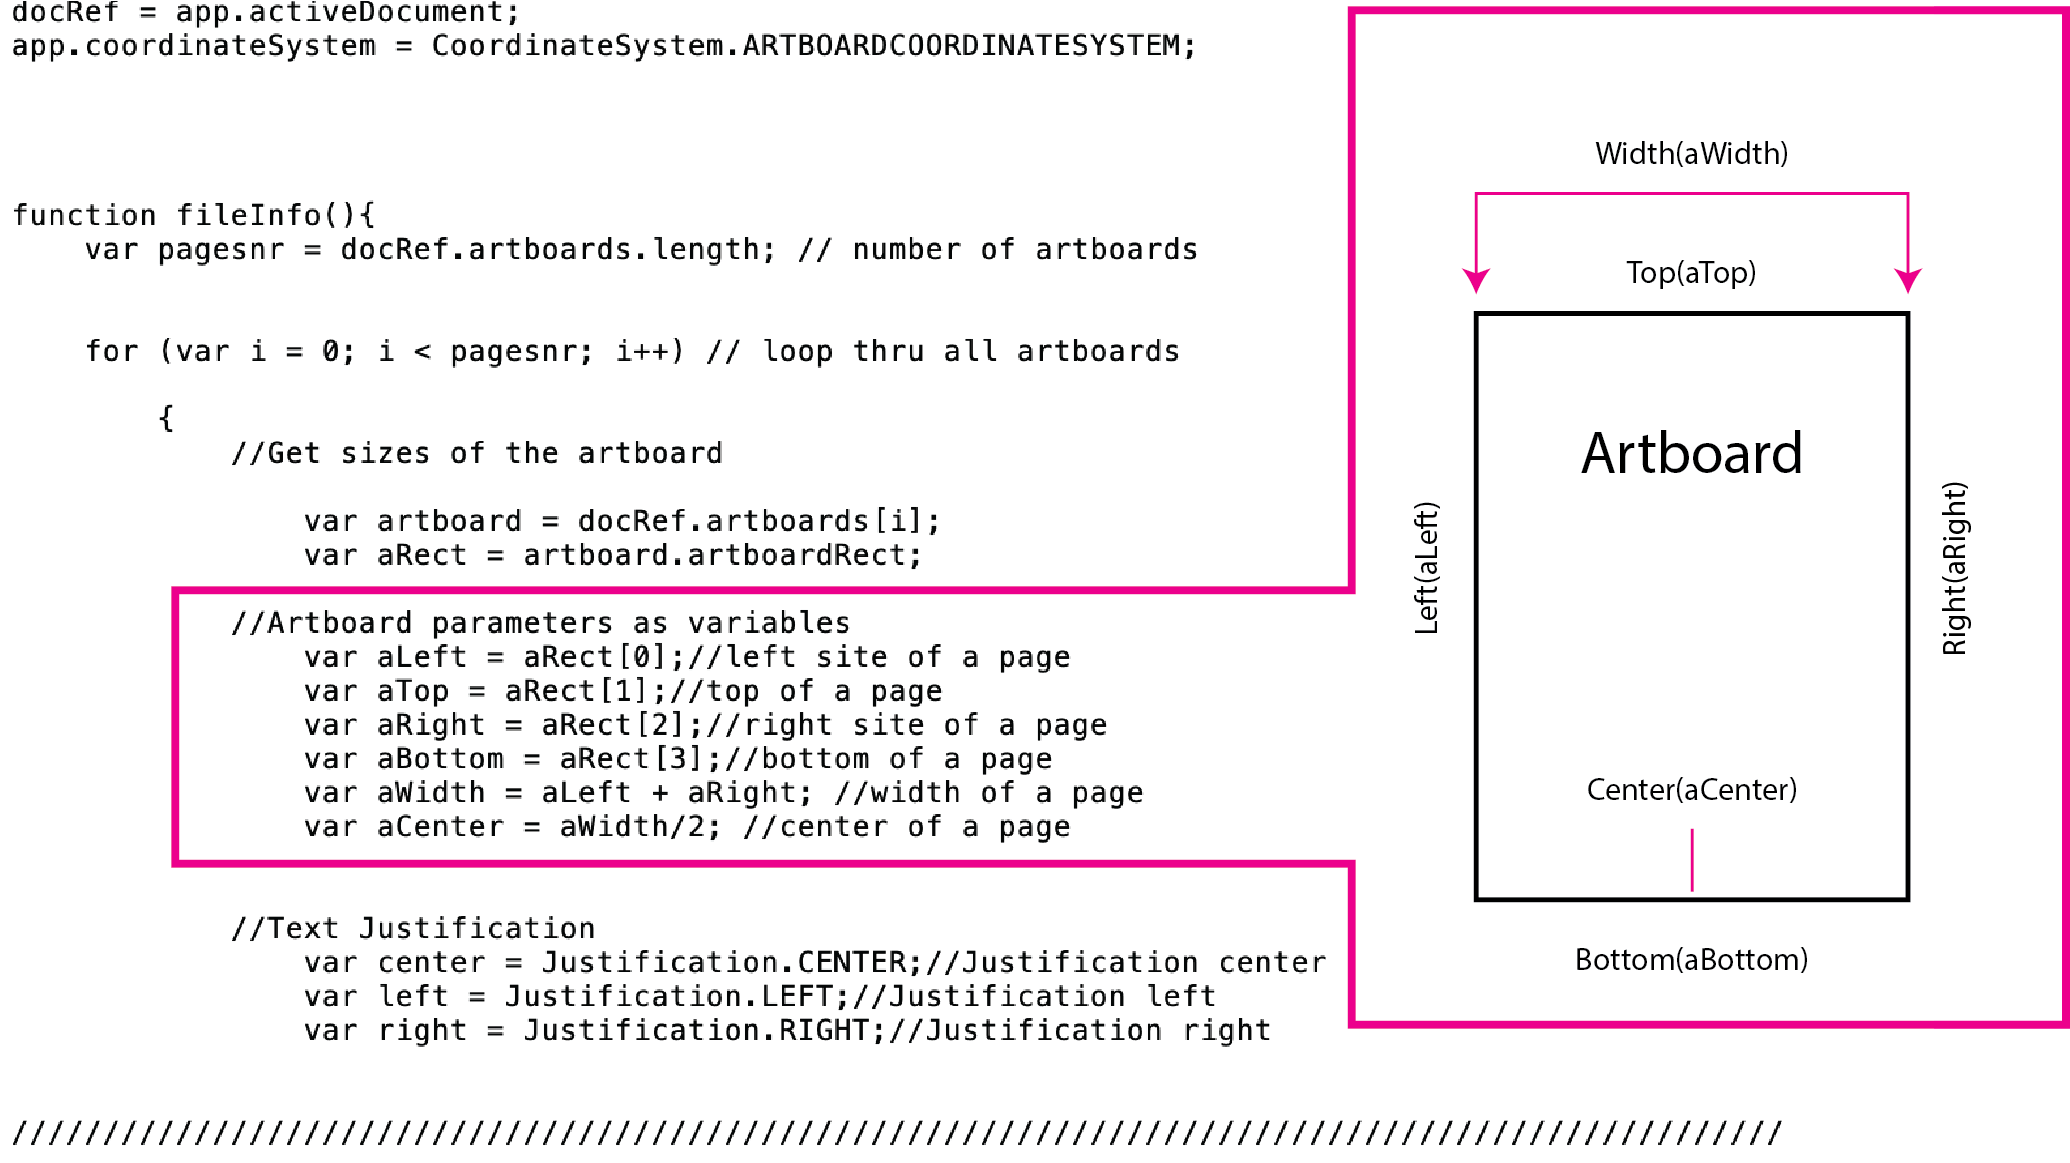
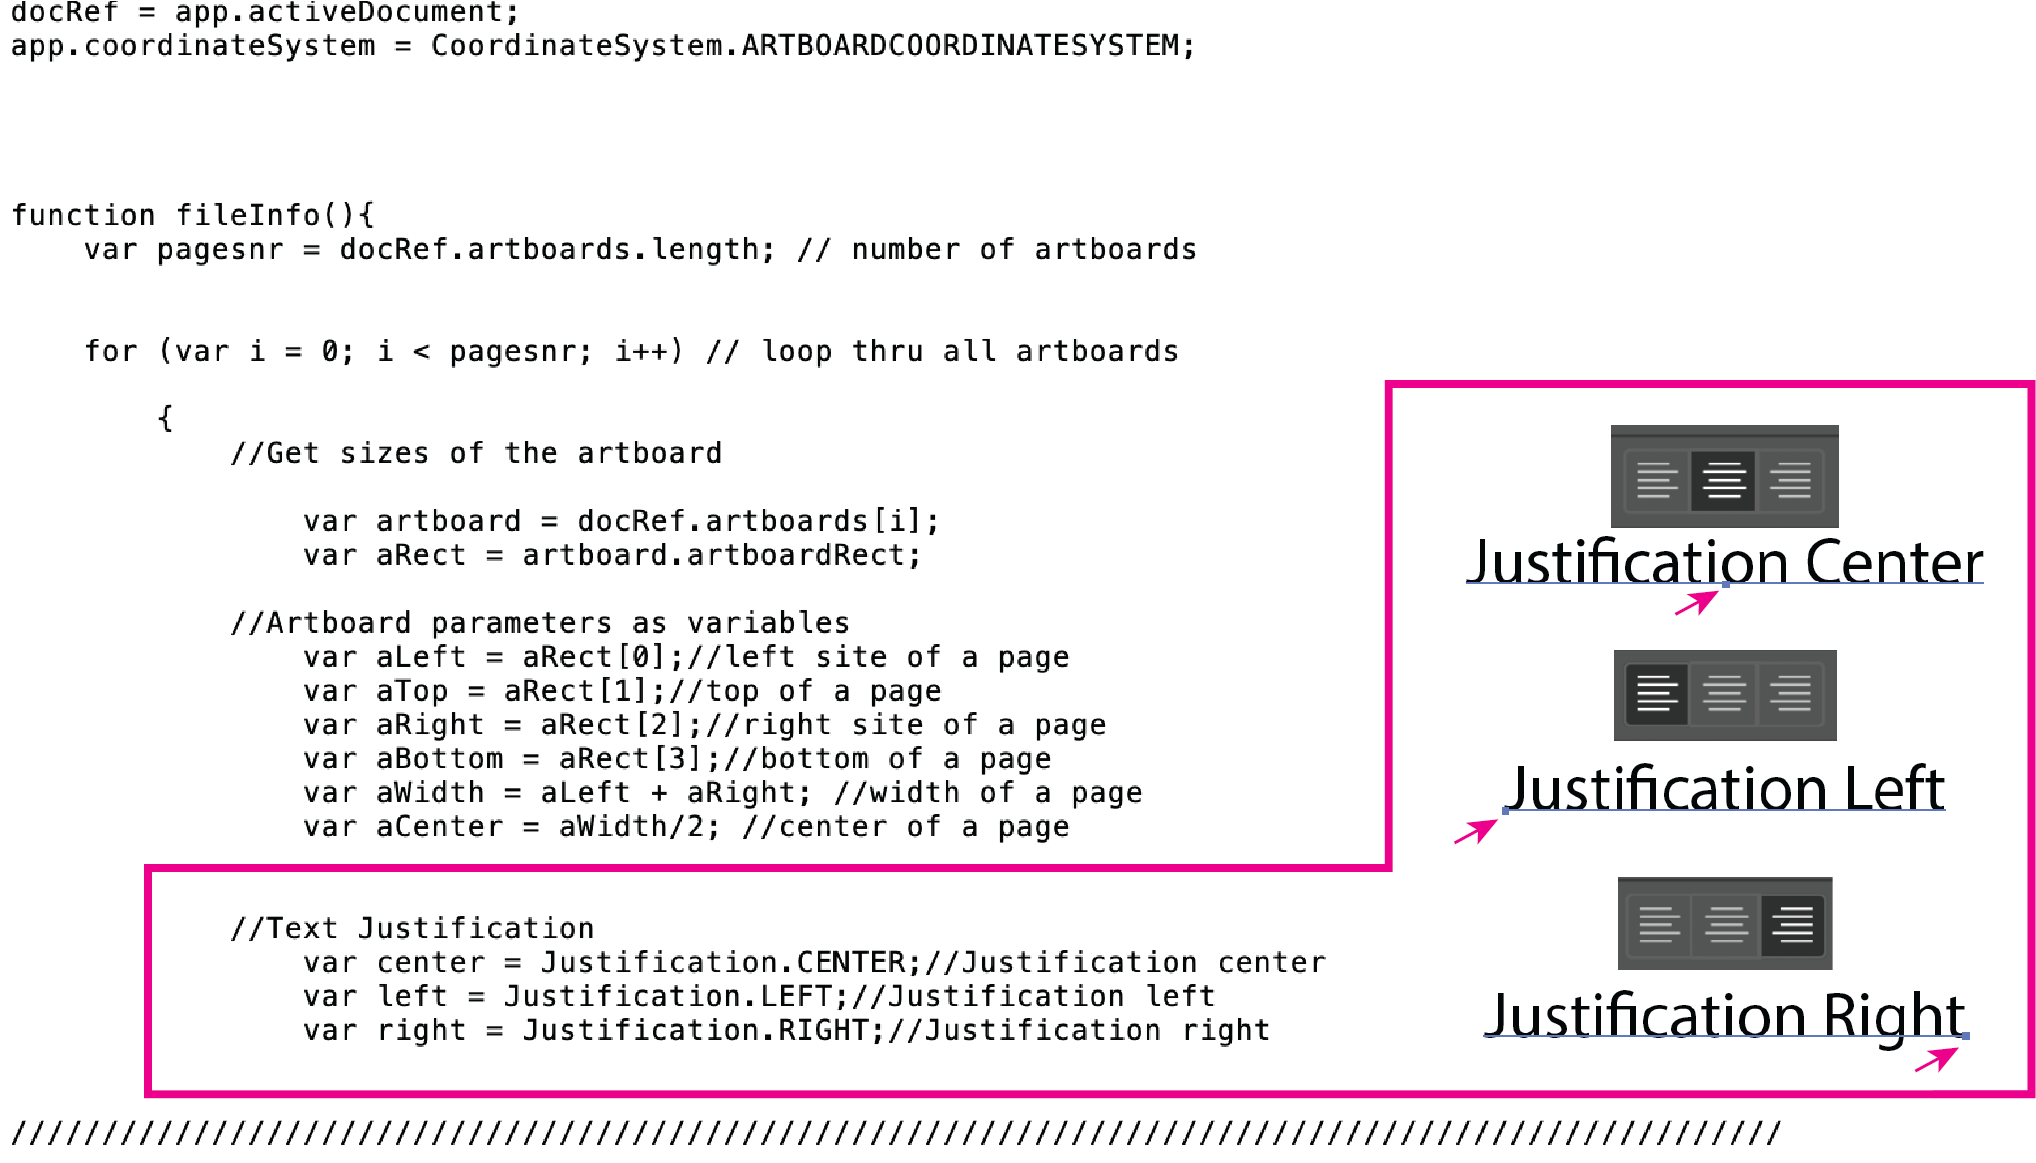
To have an idea of how the information will be placed on artboard, we need to understand the artboard coordinates. In the magenta frame, you can see the parameters for an artboard: Top, Bottom, Left, Right, Width and Center. These coordinates are accessed through the artboards rectangle settings. In the code in the Figure 1, the variable aRect is assigned the artboards rectangle dimensions and the different coordinate values assigned to the variables, aLeft, aTop, aRight, and so on. We do this so that we can easily access these numbers through the variable names later.
Margins or offset
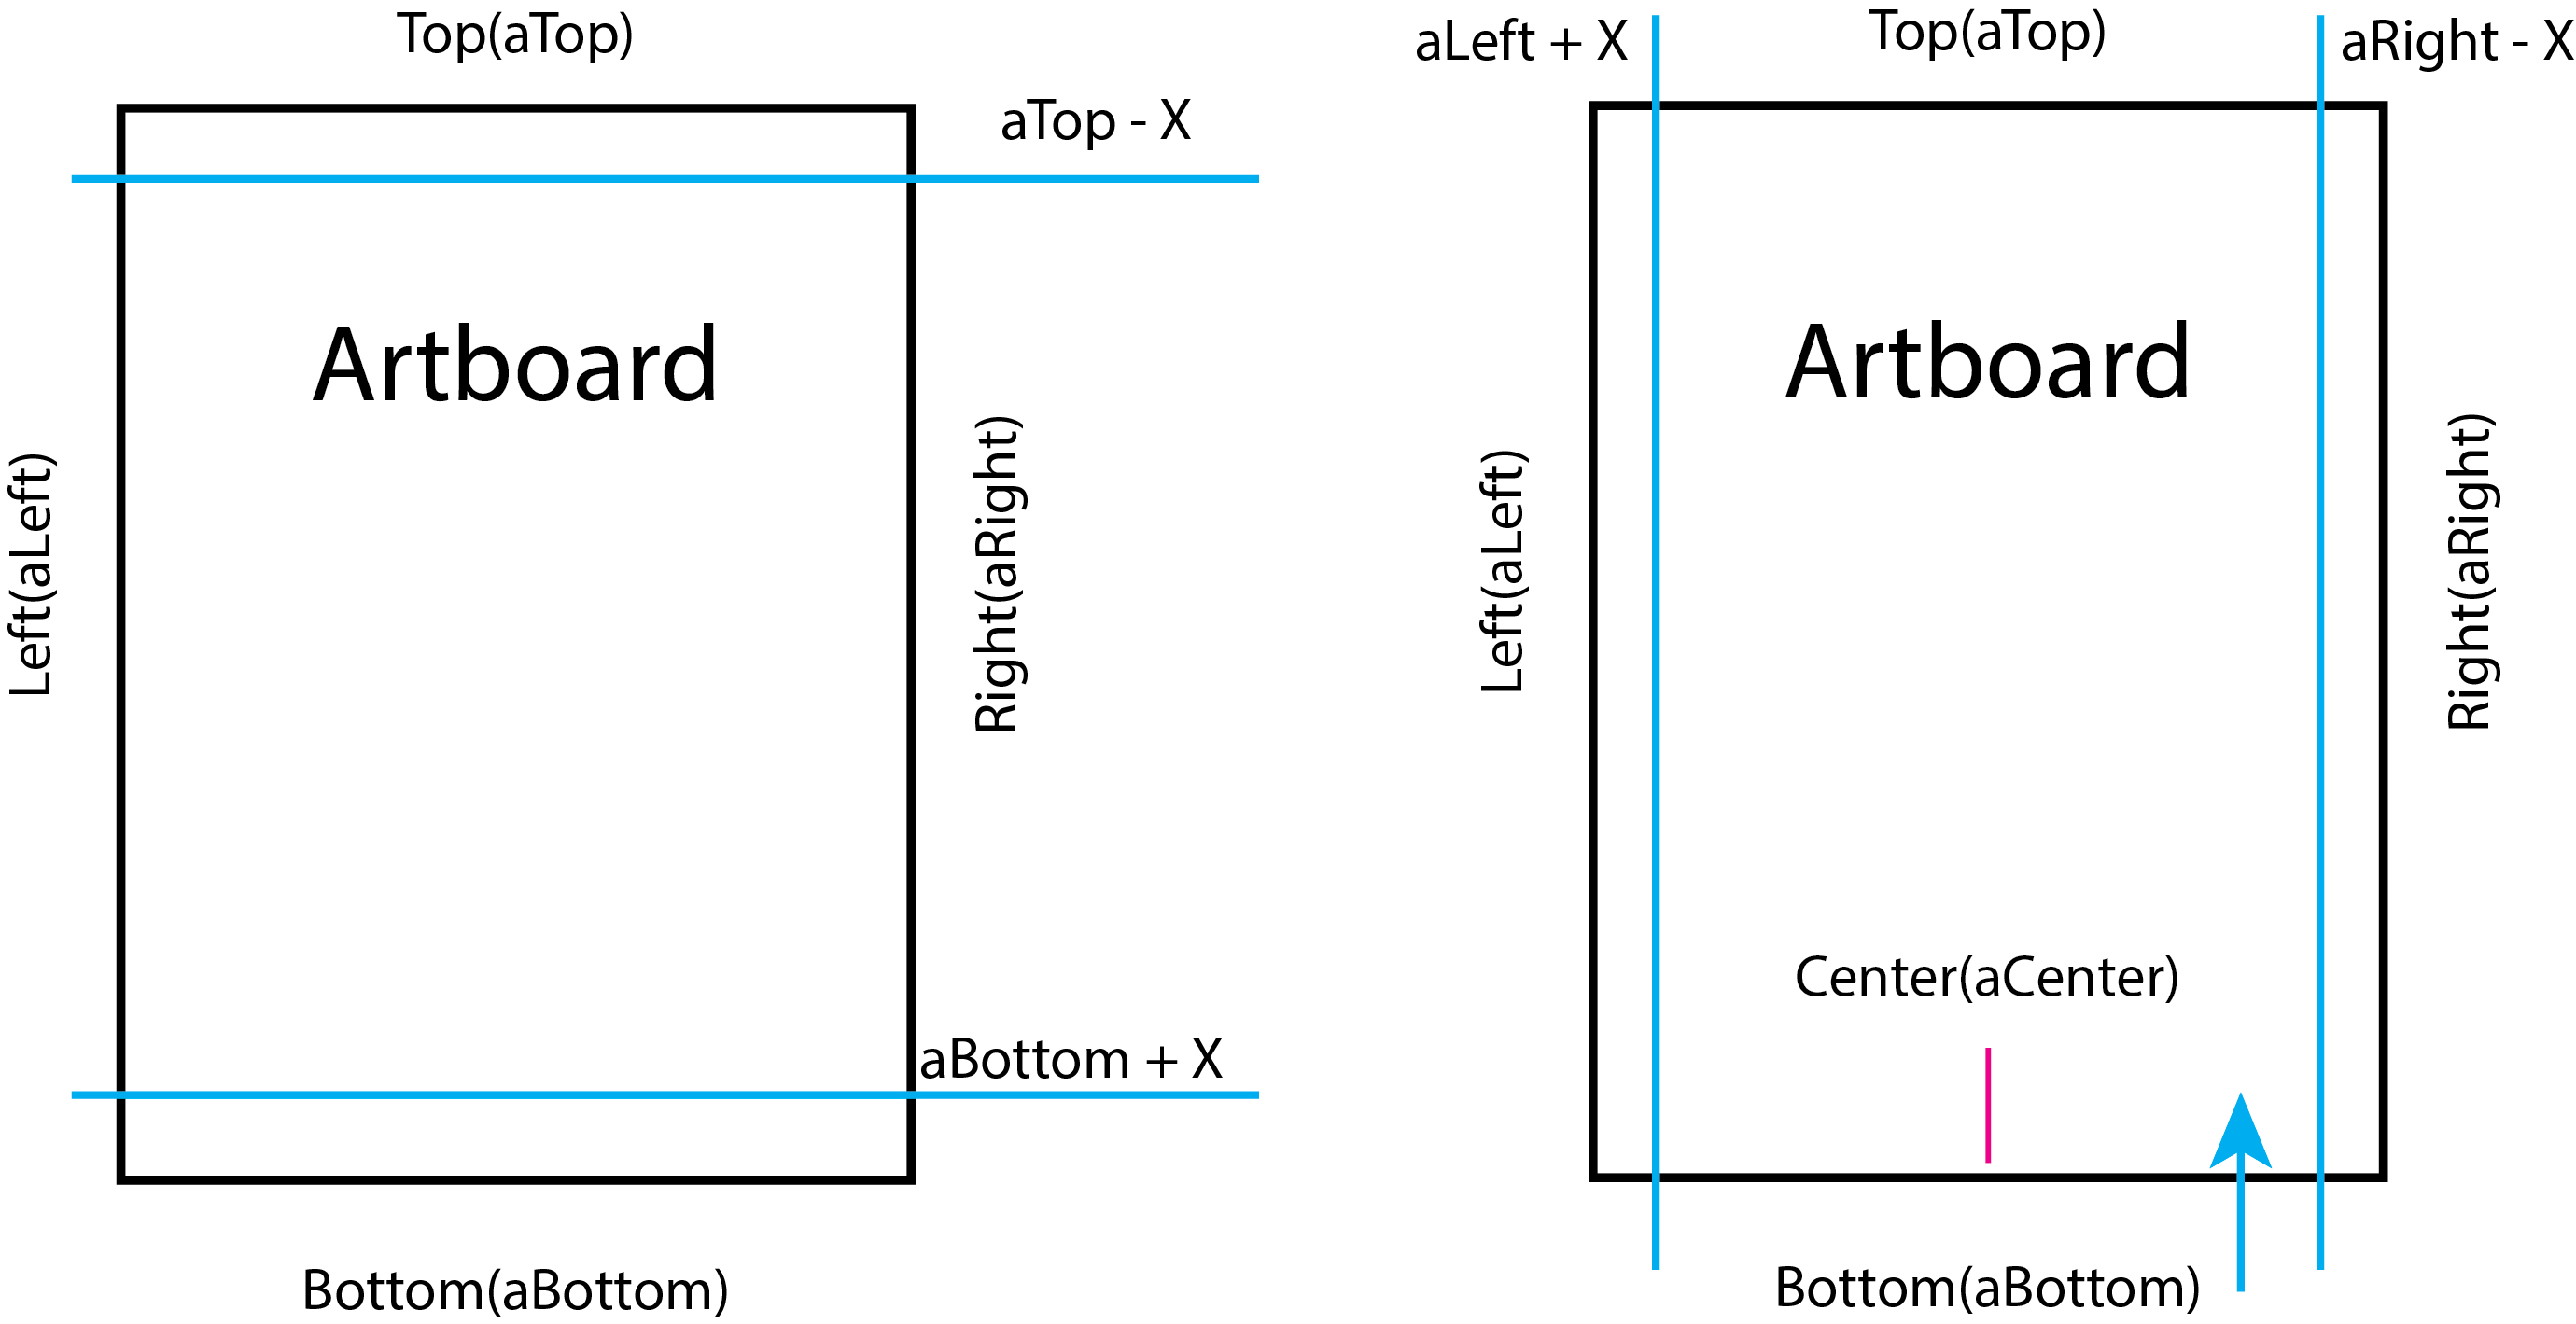
It is best to calculate your margins or offset in relation to the artboards borders in case you change the artboards dimensions or proportions. In Figure 2 I illustrate where the margins are. Y-coordinates is then” aTop – X” and “aBottom + X”, where X is your offset or margin from the top or bottom. Similar for the horisontal position X-coordinate is “aLeft + X” and “aRight – X”, where X is your margin.
Justification
INFO: To make the justification a bit easier I defined some variables at the start of the script. I made it also for the left side, despite it isn’t really necessary. Text will justify left by default. See Figure 3 for explanation.
I hope you are not scared of all this information and will be back for my next post. There I’ll explain how you can edit your script. You’ll learn how to apply font family, change the size and color of your text, and more …




9 Responses
Amazing 🙂
How could I change ” PAGE 1 OF 100 PAGES ” to only numbers ??
Thanks ahead
Thank you for your comment. Please look at the third part of this post series, (especially at Figure 7) https://productivista.com/adjust-date-and-page-numbers-in-your-pagesdatename-script-part-3/
I described there how you can change it. If you only want to have a page number just wright “var pageText = (i + 1)” 🙂
Thank you for this!!! It was a big help
thank you! this was brilliant and so easy to customize!
Hey!, Thank you very much for this plugin, I also have a question, when I use it in a file that already has other layers and designs in it the script crashes (I think) and I have to force close Illustrator, but when I use it in a new file without any other design it works perfectly, do you know why this could be happening?
I appreciate the time you put into this!!!
Thank you for reporting this issue. I’ll take a look and see if I can find a solution.